
Do You Know How to Measure Scope Ring Height?
After installing the new scope, I pulled the trigger with great anticipation, only to hear the “click” sound of the lens colliding with the barrel. It took half an hour to adjust the distance between my eyes, but the edge of my field of vision was still pitch black. The “standard ring” I bought online with great joy, only to find that it couldn’t fit into the objective lens cover at all when I got it… Can each of these annoying things touch your heart? Choosing the wrong sight scope ring is not just a waste of money – damaged equipment and missing crucial shooting opportunities – these “costs” can make you regret it in no time.
But don’t panic! Today’s blog will guide you step by step on how to precisely match the scope ring height without professional tools in just 3 steps. Say goodbye to the installation nightmare from now on!
Why Does Scope Ring Height Measurement Drive People Crazy?
Do you think choosing the wrong scope ring height is just spending a little more money in vain? Completely wrong! There are quite a few “hidden” cost traps hidden here. The high cost of buying the wrong item, the round-trip return and exchange fees, and the long waiting time are all headaches. How frustrating it would be if the hunting season were over by the time the new ring arrived! Worse still, the incorrect scope ring height may directly scratch the lens body or the barrel. Just look at the shocking scratches on the lenses and the peeling paint on the barrel. The repair cost is another considerable expense.
Apart from the wallets being affected, the physical compatibility issue is also frustrating. The large objective lens hit the low guide rail, and the objective lens cover directly collided with the barrel of the gun. The height of the lens body was not selected properly, getting stuck at the ejection port of the cartridge case. Frequent malfunctions occurred during shooting. The high-power lens has a severely blocked field of view due to incorrect scope ring height. By comparing the field of view images with correct and incorrect scope ring heights, the difference is obvious at a glance.
There are also “disasters” in the field of ergonomics. It’s uncomfortable to press against the cheek. When aiming, the hand trembles along with it. After firing a few bullets, the chin hurts terribly. No matter how you adjust the eye distance, it’s never right. The parallax error is getting larger and larger, and precise shooting has become a luxury.
The Three-Step Method For Precise Scope Ring Height Measurement
Don’t worry. Here comes the solution! Remember this key principle: The focus of the measurement is on the “available space”, not the ring itself! Get your ruler or vernier caliper ready, then take out your gun and sight. Let’s get started right away!
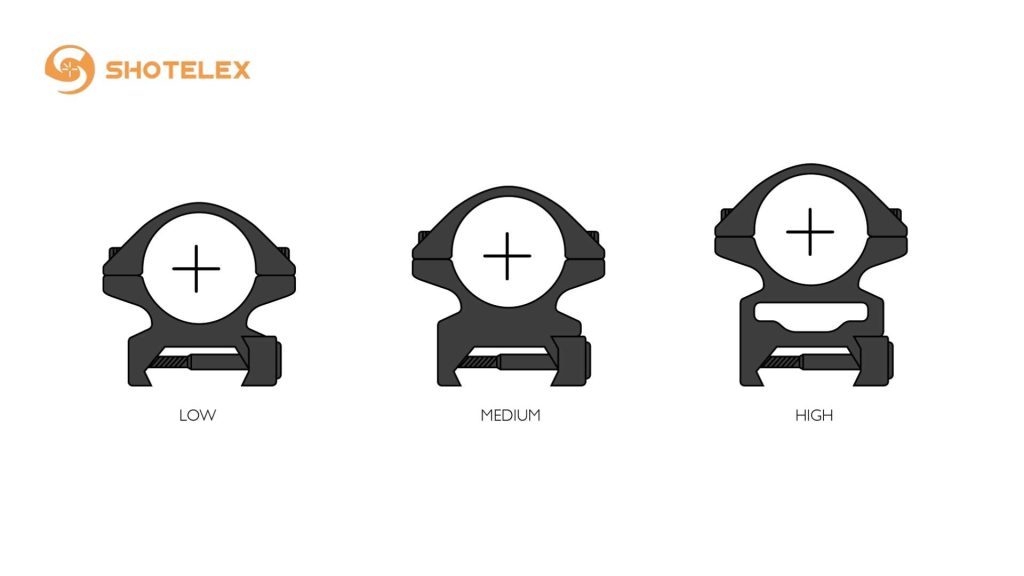
Step 1: Locate the “Death Triangle”
First, it is necessary to accurately identify three key measurement points. Measurement point ① is from the rail plane to the highest point of the gun barrel. Be careful to avoid interference objects such as heat shields and protrusions. Measurement point ② is the diameter of the thickest part of the objective lens cover. Here, the thread of the lens hood should be ignored. Measurement point ③ is the line from the base of the eyepiece to the center of the tube. This point directly determines whether you feel comfortable when pressing your cheek against it. Look at the schematic diagram and mark these three points clearly.
Step 2: Calculate the minimum safety gap
With the measurement data available, it’s time to start calculating the appropriate scope ring height. The formula is very simple: scope ring height > (① + ②/2) + safety value. The safety value here is not fixed. Tactical guns require a safety value of 2mm, while precision shooting guns need 1mm. As for why there is such a difference, it mainly takes into account the usage scenarios and recoil conditions of different firearms. Don’t underestimate this safety value. If the deformation caused by thermal expansion and recoil is ignored, the tragedy of the lens colliding could occur at any time. Those close-up photos of the impact marks are the best warning.
Step 3: Verify ergonomic compatibility
The last step is to verify whether the selected scope ring height is really appropriate. There are several quick verification methods: When pressing the cheek, the eyeball should be naturally centered without deliberately raising or lowering the head. The fingers can be easily inserted between the lens tube and the gun barrel. Observed from the side, the ejection trajectory has no obstructions at all. Combined with dynamic demonstrations, it makes everything clear at a glance for you.
Three Items Must Be Checked Before Purchase
When choosing a good scope ring height, one cannot be careless during the purchasing process. First of all, make good use of the gun type database; Secondly, take a closer look at the real photos taken by other users, with a particular focus on the gap between the objective lenses. Finally, find the PDF drawing from the manufacturer and extract the key dimensions according to the tutorial.
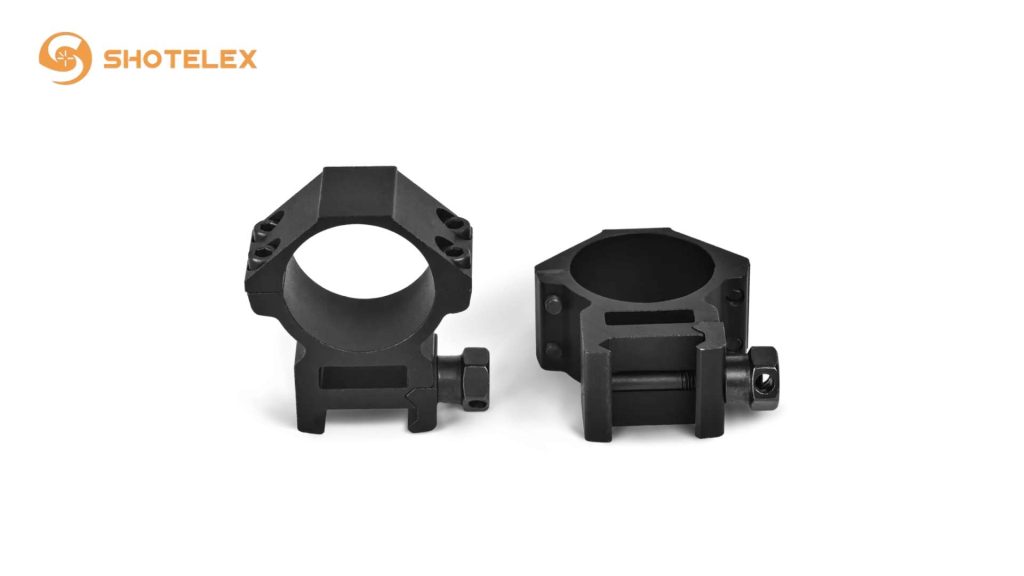
When you get the ring, don’t rush to install it. First, verify it. Find a bank card simulation mirror tube and insert it between the gun barrel and the “mirror tube”. If there is no resistance when sliding, it indicates that the size is basically correct.
Final Thoughts
Height can really determine accuracy! The scope ring height is not an isolated parameter but a key factor concerning the entire shooting system. Follow the steps in this article to measure once, and in the next ten years, you won’t have to spend an extra penny on the environmental protection issue! Take action now and start measuring!